Automation is the power of today's business enterprises, and robust tools like ServiceNow, a cloud-based platform, fulfill it. The business market is moving ahead with automation, innovative customer experience, ML, etc. Further, it connects with various devices to use data and other workflows effectively. Using many outdated tools and methods has slowed down the process of solving customer requests, HR activities, and other IT events. However, business enterprises need to be speedy to catch the trends. ServiceNow is a robust platform that helps to automate and speed up all these activities for a business. It offers a defined structure and solutions for process automation to advance the work speed. This blog discusses ServiceNow, its usage, and its importance in the business world, along with its various other aspects in detail.
- The Purpose of Using ServiceNow
- What is ServiceNow?
- What are the features of ServiceNow?
- ServiceNow Scripting
- ServiceNow Installation
- ServiceNow Administration
- How can a user be created in ServiceNow?
- How are users and groups configured in ServiceNow?
- Creating Report in ServiceNow
- How can I develop applications on ServiceNow?
- What is the architecture of ServiceNow?
- Importing Sets in ServiceNow
- What is the history of ServiceNow?
- Conclusion
What is ServiceNow?
ServiceNow is a cloud-based platform for building and running digital workflows. In plain terms, it is where a company manages the flow of work between people, departments, and systems. It tracks requests, routes them to the right person, automates the repetitive parts, and keeps a record of everything.
It started narrowly. The company was founded in 2004 by Fred Luddy, who had previously been CTO at Peregrine Systems, and the first product was IT service management, essentially a better way to run a corporate help desk. That is still the heart of the platform, but it has grown well beyond IT. Today the same underlying system runs HR case management, customer service, security operations, and custom apps that companies build for their own needs.
The reason it spread is worth understanding, because it explains why the platform is structured the way it is. Everything in ServiceNow lives on a single platform and a single database. When IT, HR, and customer service all run on the same system, a request can move between them without anyone exporting a spreadsheet or copying data by hand. That shared foundation is the whole selling point.
A simple way to picture it: think of ServiceNow as a very organized system for tickets and the work attached to them. Something needs doing, it becomes a record, and that record follows a defined path of assigned, worked, approved, and resolved. The platform automates as much of that path as the company chooses to automate.
Get ahead in your career by learning ServiceNow course through itcanvass ServiceNow Training !
The Purpose of Using ServiceNow
There are many uses of ServiceNow in real-time. It is developed with smart workflows to accelerate business processes. It offers multiple solutions to make the various work patterns structured. ServiceNow connects with all the employees, customers, and devices within an organization. It helps to make all the requests using a single platform, ServiceNow, a leading cloud platform for process automation.
When dealing with the requests, different divisions can assign, prioritize, correlate, identify the underlying causes of problems, obtain real-time insights, and motivate action. Employee productivity is increased by this workflow procedure, which finally raises service standards. ServiceNow offers cloud services to the whole company. Below are the reasons why ServiceNow is essential to the business enterprises:
ServiceNow is sold as a set of products that all sit on the same platform. You do not need to learn all of them, and most people specialize. But you should be able to recognize the main ones, because job descriptions and tutorials throw the acronyms around constantly.
ITSM (IT Service Management) is the foundation and the best place to start. This is the classic service-desk toolkit: Incident Management for things that are broken, Problem Management for the root causes behind repeated incidents, Change Management for controlled updates to systems, and the Service Catalog where employees request things like hardware or access. If you learn one area first, learn this one.
ITOM (IT Operations Management) deals with the infrastructure behind the scenes. It discovers what servers and devices exist on the network and keeps that inventory accurate. This is where the CMDB lives (more on that shortly).
ITBM / SPM (IT Business Management / Strategic Portfolio Management) covers the planning side: projects, portfolios, and how IT spends its time and budget.
CSM (Customer Service Management) applies the same workflow engine to external customers rather than internal employees.
HRSD (HR Service Delivery) does the same for HR, covering onboarding, employee questions, and case management.
There are more (Security Operations, GRC, and others), but ITSM, ITOM, and CSM are the three you will hear about most as a beginner. Everything else follows the same underlying logic once you understand the core.
What is the history of ServiceNow?
ServiceNow was founded in 2006, and it has over ten years of successful business. After opening its office in Silicon Valley in 2007, ServiceNow had a greater impact on businesses, and it was the key turning point for it.
In 2011, two top MNC firms, ServiceNow and Accenture, partnered with each other. With this alliance, ServiceNow further improved its services and other solutions by accessing key resources.
Further, in 2012, ServiceNow became public with its IPO, and the company raised a market capital of $210 Million. With this, ServiceNow company has enhanced its financials and extended its market exposure and honor.
ServiceNow also made some strategic acquisitions to grow much better, such as acquiring a UI company, Telepath, in 2017. With this buying, ServiceNow improved its product usability and refined its services well. It also improved its UI experience.
In 2018, ServiceNow bought the NLP startup FriendlyData, thereby enhancing its services. This acquisition helped the company benefit from innovative NLP technology. It enhanced the ServiceNow processing of user input in a more effective way.
Moreover, ServiceNow acquired a leading mobile analytics company, Appsee, in 2019, which turned into a major deal. This acquisition helped them to gain expertise in using mobile devices, and it provides users with a personalized experience. Further, ServiceNow acquired AI Loom Systems and Passage AI in 2020. This acquisition helped ServiceNow improve customer services through advanced AI and ML capabilities.
Visit here to learn ServiceNow Training in Hyderabad
What are the features of ServiceNow?
ServiceNow is a robust platform with a variety of features to boost efficiency and optimize processes. Let's explore some of its salient features in more detail:
1) Authentication:
With its single sign-on (SSO) capabilities, ServiceNow's validation feature streamlines user access. Because the program supports different provider SSO functionality, users can log in without having to remember several user IDs or passwords.
2) Enterprise Portal
Any business that wants to simplify customer requests, service feeding, and support needs a solid online portal. The Service Portal from ServiceNow is a strong tool that displays the strengths of the platform and offers improved features. It shows all this on the CMS website, which has been replaced. Further, users may get help and effectively access the services using the Service portal. It offers an enhanced experience to users.
3) LDAP Integration:
The ServiceNow platform is able to connect with Active Directory (AD) and LDAP systems easily. It allows organizations to utilize predefined designs and models for different purposes. The LDAP integration is a robust tool with less coding and offers easy-to-set-up features for many uses. It also offers access to the application and Outlook allocation list handling services.
4) Web services
The ServiceNow platform offers support for multiple protocols such as REST API, SOAP, and more. It allows users to ingest or issue APIs much faster. Further, ServiceNow's key function, Web Services, allows business entities to connect faster with external systems. These systems can be programmed or codeless.
5) Orchestration:
This feature of ServiceNow allows businesses to automate their routine tasks on remote servers.
It reduces the need for tedious manual work and other special tools. Also, it simplifies complex processes and enhances productivity with its extensive automation features to MS Exchange mail servers and VMware across the systems.
6) Mobile Ready:
There is a good demand for mobile-ready apps and mobile-based extensive services nowadays.
In this mobile-centric space, it is essential for enterprises to provide mobile-based apps.
ServiceNow helps in this regard by identifying the need and offers a mobile-friendly method that can adapt to changes flawlessly. Through iOS and Android-based native and digital apps, companies can provide extensive mobile service experience to users. It does so without requiring extra development efforts.
To sum up, ServiceNow provides an abundance of tools and functions that enable businesses to optimize efficiency, simplify processes, and provide great customer service.
Terminology used in ServiceNow
The following terms are frequently used in ServiceNow.
1) Lists:
They are used to show a collection of records from the data table to view and collect data on the platform.
2) Users:
These are the individuals who use the ServiceNow platform. System Admin can easily create and manage them and hold the ability to add and delete users as required, along with profile changes.
3) Roles:
In ServiceNow, roles are the duties executed by the company users who are allocated to individual profiles based on work. They are also able to access specific data and define user access and permits.
4) Groups:
In ServiceNow, groups are sets of people who collaborate to complete related activities or goals. The sections with names - 'groups or Groups' and 'System security/Users' give access to these groups. They offer an approach to organizing and monitoring users based on their positions or duties.
5) Forms:
In ServiceNow, forms present the individual records and connect them through a data table. With a user-friendly interface, it offers the ability to update data in the system. It also enables users to update data with accuracy and effective data handling.
Hence, these ServiceNow terms help companies manage data efficiently and offer flawless platform actions. Also, it provides relevant tools and functions to users to seamlessly complete their tasks.
Check out Top ServiceNow Interview Questions and Answers that help you grab high paying jobs

Servicenow Admin & Developer Training
- Master Your Craft
- Lifetime LMS & Faculty Access
- 24/7 online expert support
- Real-world & Project Based Learning
ServiceNow Scripting
The platform ServiceNow provides the following types of Scripting:
- Client-Side Scripting
- Server Side Scripting
1) Client Side Scripting
This scripting type can run in several methods, such as showing alert notices, settling form fields, and setting up single-area values based on user replies in various form fields. The client-side scripts are of different types:
- Onsubmit()
- Onchange()
- Onload()
2) Server Side scripting
The server-side scripting runs on the Now platform server, which helps develop custom user interfaces. They can execute different actions like updating record fields and specifying field values.
ServiceNow Products:
In ServiceNow, there are many products & services:
1) HR Services Management
The ServiceNow platform is helpful in delivering HR services efficiently. It includes handling timesheets, leaves, delays and absences, employee performance, and other related documents.
2) ServiceNow Instance
A ServiceNow instance is a group of databases, apps, and virtual machines that offer multiple customer services. In a multi-instance structure, many companies build ServiceNow customer instances.
3) ITSM
The ITSM or IT Service Management is a popular service offered by ServiceNow as a ticketing tool. It resolves many issues, updates, and incidents, covers various insights, and enhances analytics and functions affecting IT service delivery.
4) Finance Management
The ServiceNow platform effectively handles financial management. It automates the financial operations and activities within an enterprise, and it offers various other services like IT security, digital chatbots, etc.
ServiceNow Installation:
The following are the steps to install and activate a ServiceNow account. Please go through the below guidelines in detail:
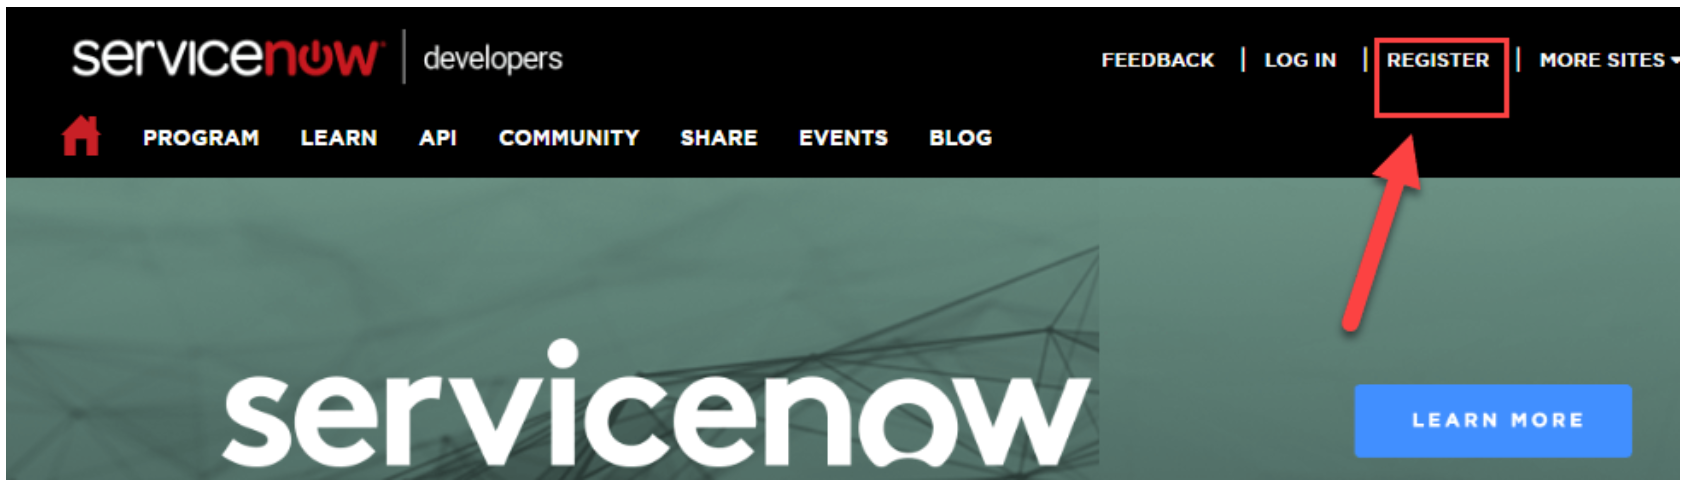
1) Visit the website 'https://developer.servicenow.com/.' Find the "Register" option and click the same.
2) You will see a welcome screen with the Registration window. Further, provide the registration details correctly, and finally, hit the "Submit" option.

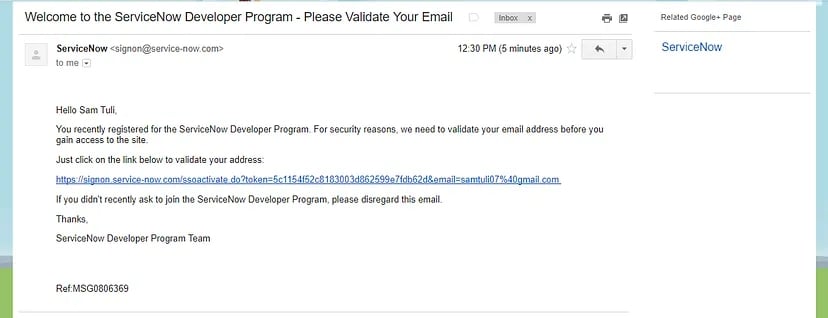
3) After submitting registration, you will see a message appearing on your screen that prompts you to trigger the account. To make your account "Active," you need to go through your email inbox. You will get an activation email with certain instructions.
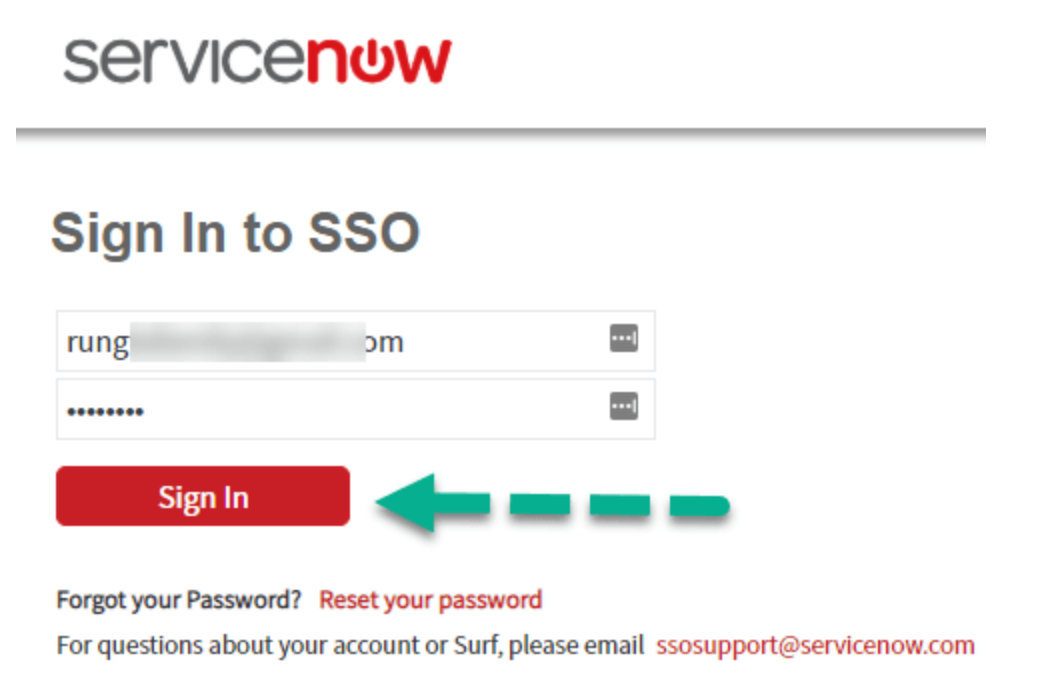
4) When your account is activated, you can move ahead to log in through the credentials you provided at the time of registration.
5) After this, you will see a Service Agreement, which you need to read and agree carefully, following all instructions to move further.
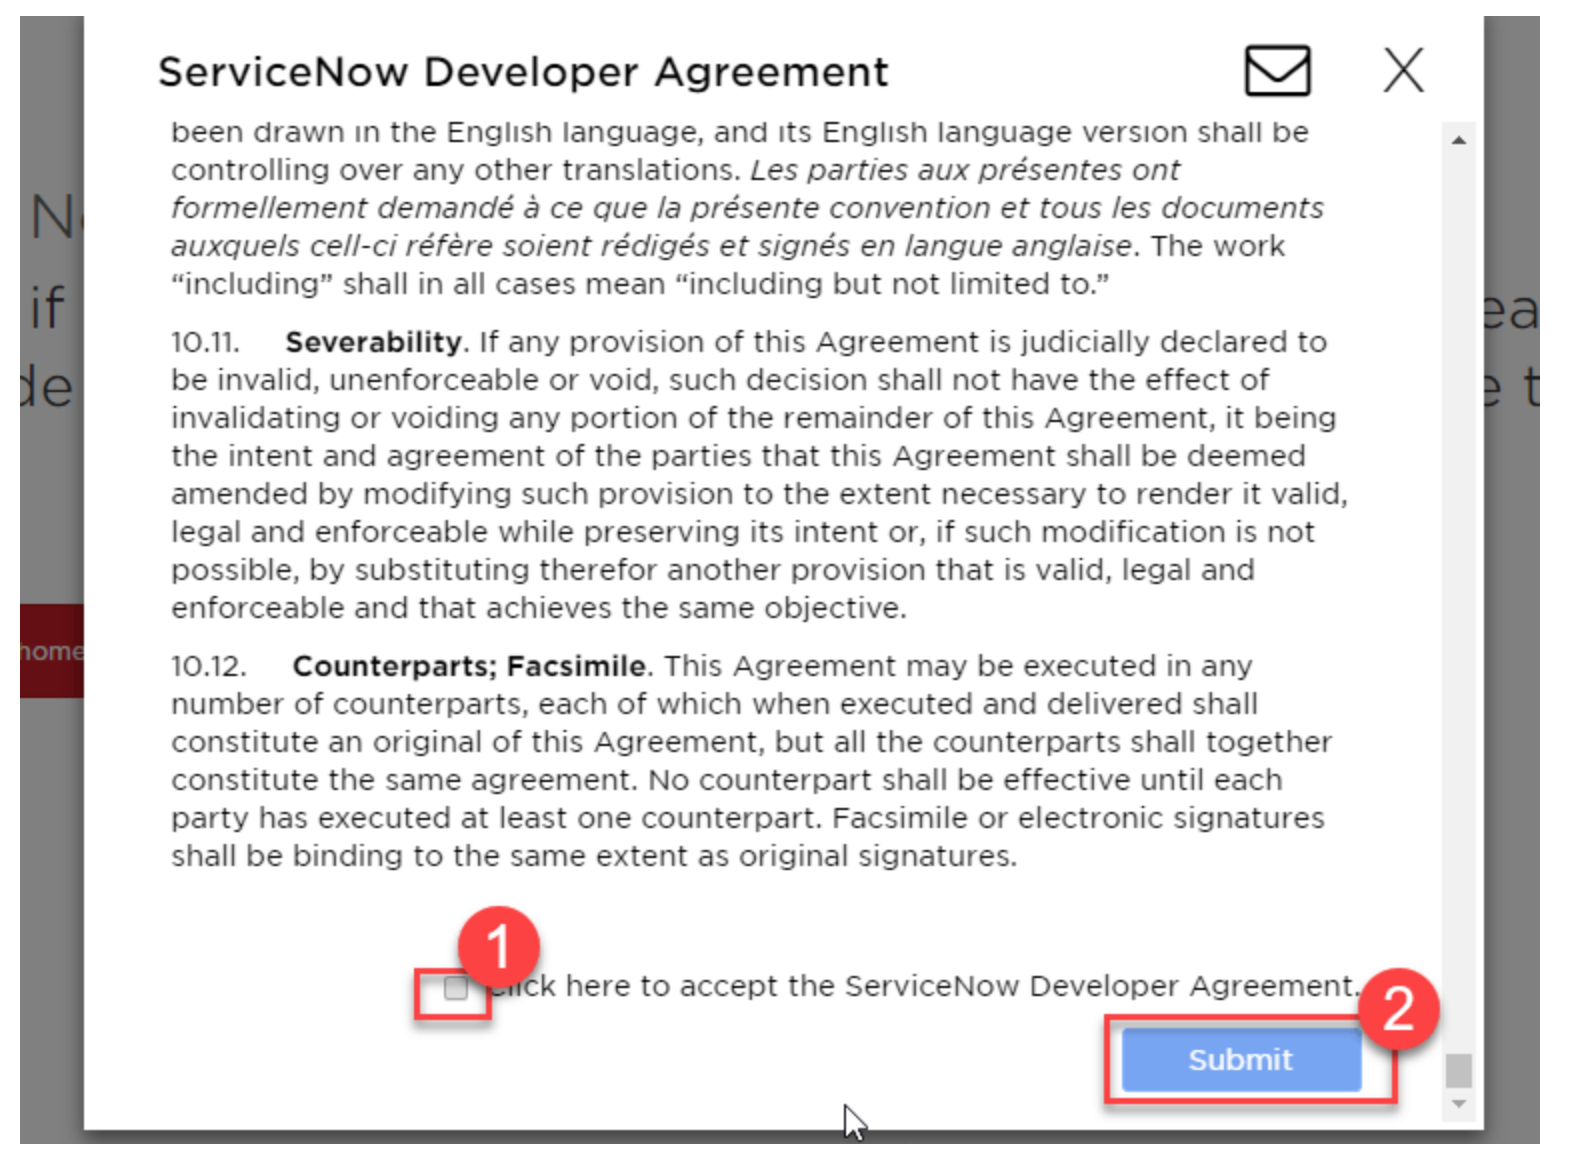
6) Then, you will find a Developer Agreement page. Go through the T&Cs there carefully and accept the deed to proceed.
7) Here, you will find a survey page with a few questions to answer. You need to answer these questions carefully by reading them and finally "Submit" them.
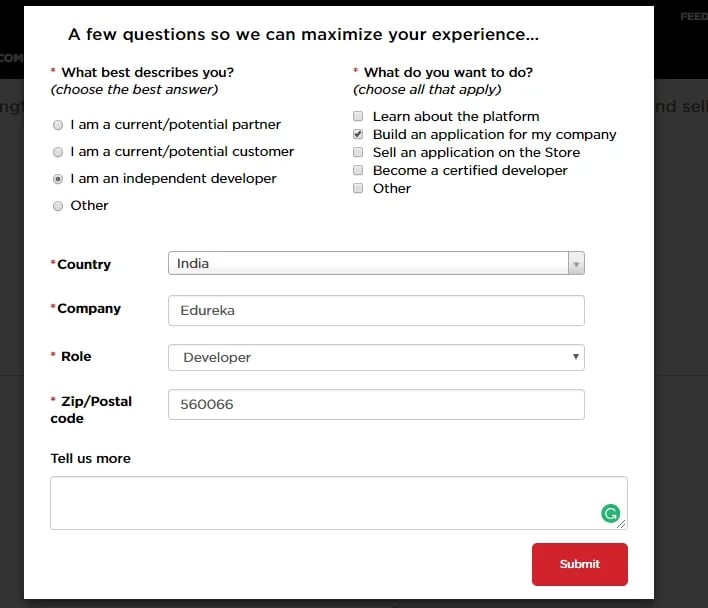
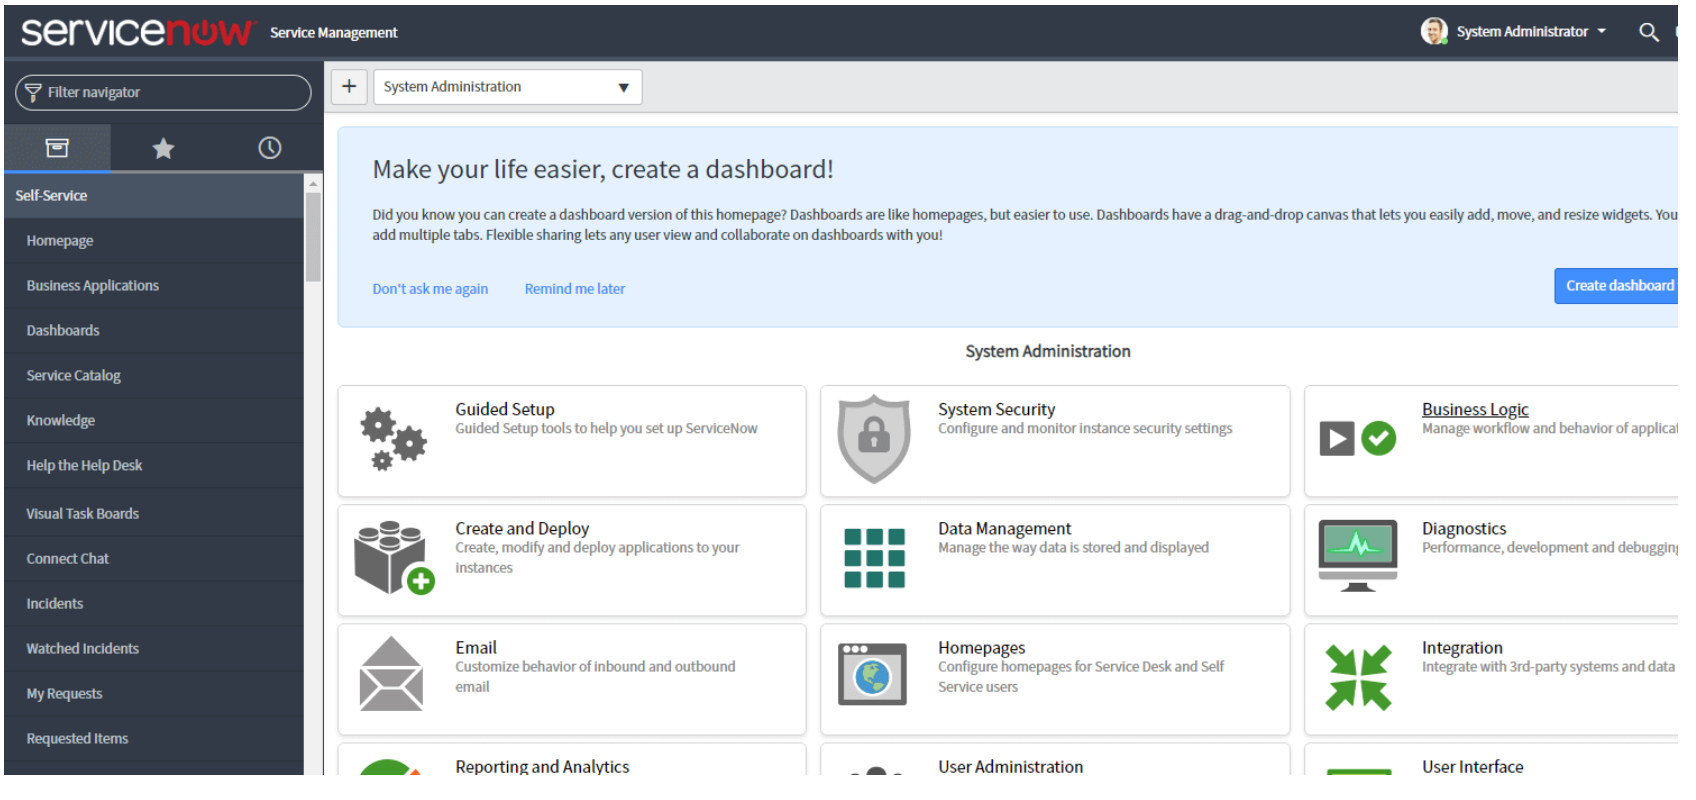
8) Once the survey is complete, you will be taken to the ServiceNow Dashboard. Locate and select the 'Request Instance' option.

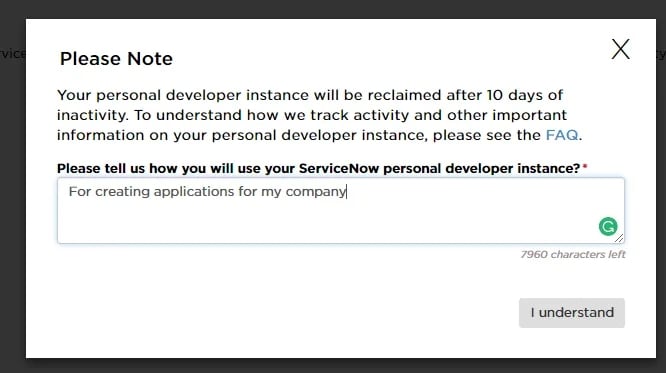
9) Clearly and concisely state why the instance is required in the instance request form.
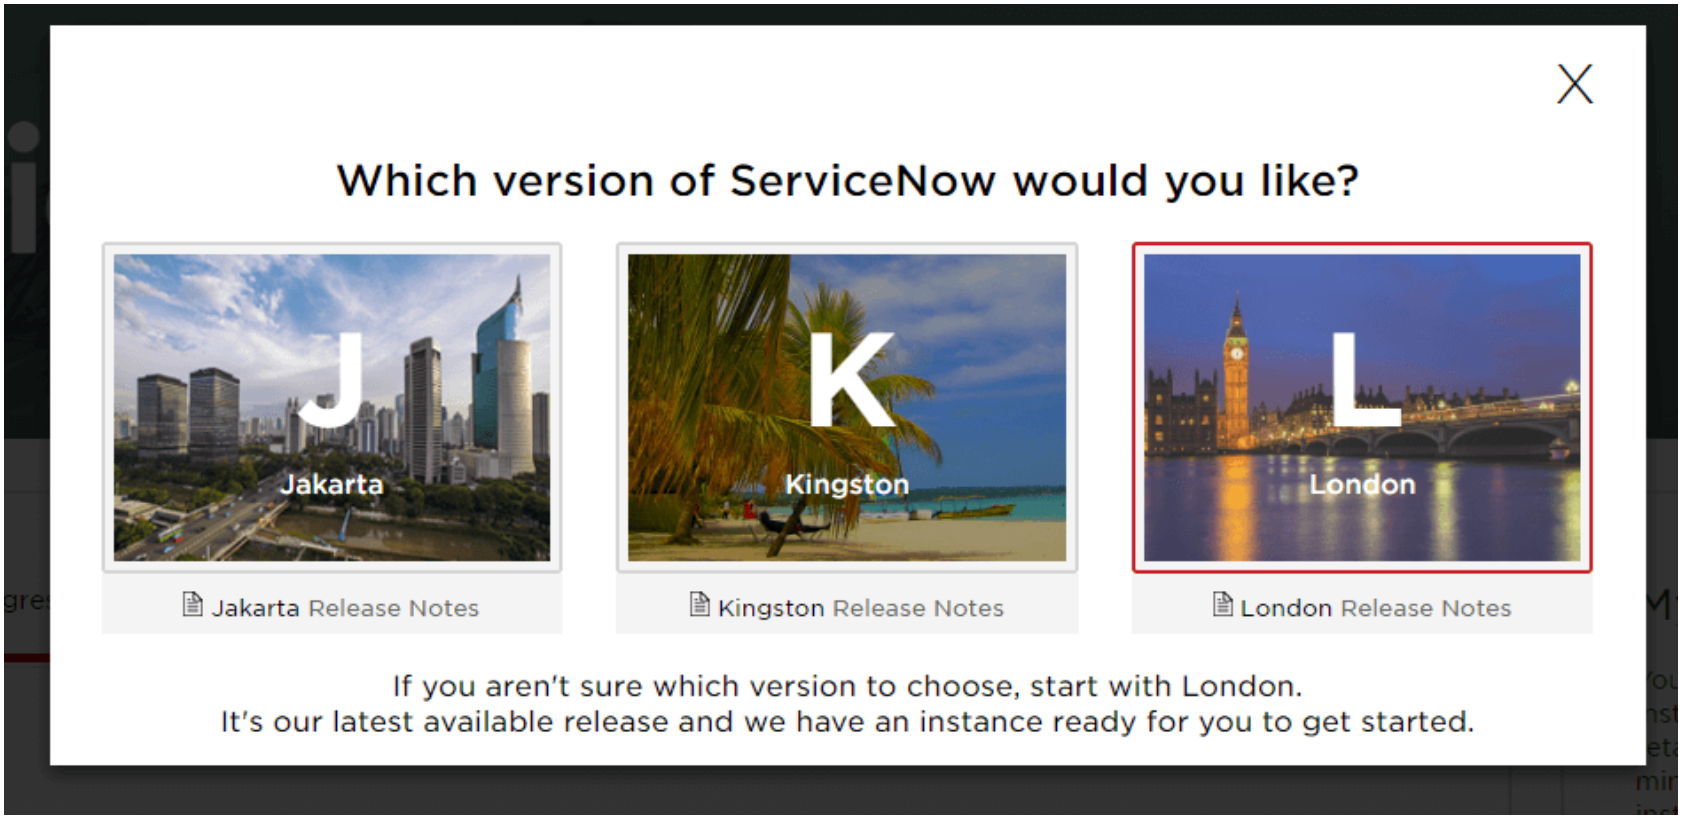
10) Pick the London edition in the list of versions when prompted to do so.
11) The overall process of instance may take some time to complete. After this, you will see the sign-in details and a link for dashboard access with ServiceNow user ID and password.
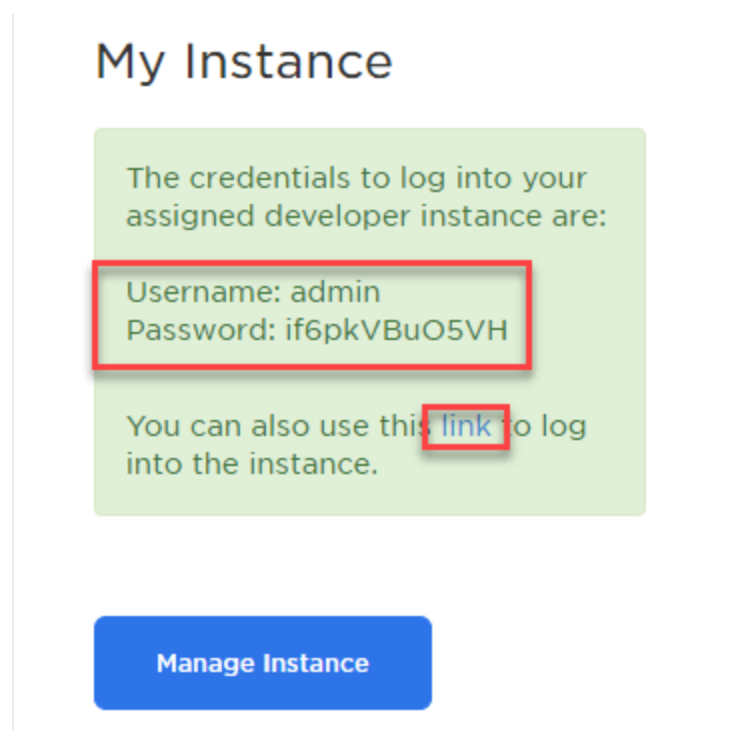
12) For ensuring account security, you need to change or update your password. You must click on the sign-in link given and update the password by going through the guidelines.
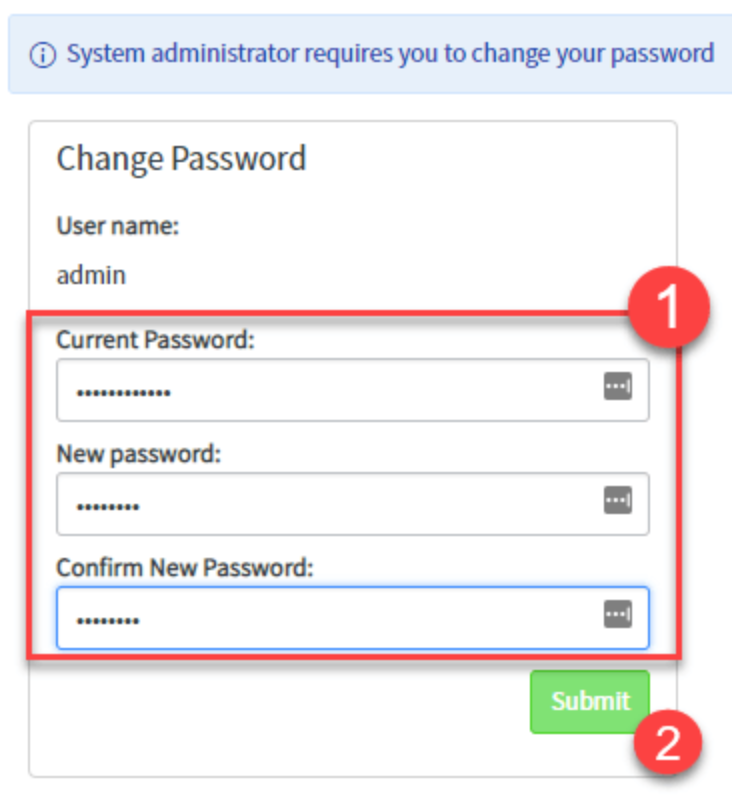
13) Thus, you can now see that the ServiceNow A/c has been activated, and you can easily access the ServiceNow Dashboard.
Hence, you can trigger your ServiceNow A/c easily and quickly without issues following the steps and guidelines.
Visit here to learn: ServiceNow Training in Bangalore
ServiceNow User Interface:
The user interface of ServiceNow includes various components that you can easily customize based on your business needs. Now you can explore the below components in detail:
1) Banner Frame:
It is one of the top features of the ServiceNow user interface that consists of multiple components. These include user profiles, a logo, a global search bar, and configuration options. It further helps users to easily access the key resources and go through the talks from the sidebar available on the right side.
2) Sidebar:
There is no sidebar available in the ServiceNow UI by default, but users can activate it through the Banner Frame. After its activation, it will provide two essential options to users; "Help" and "Conversation."
The option "Help" will enable users to access the key data and articles added by the Admins. It will make it easier to locate the required resources that support it. On the other hand, the "Conversation" option provides a real-time connection with other staff, browser's earlier chats easily, etc.
3) Application Navigator
It is a robust tool from ServiceNow that helps users browse different apps and modules existing on this platform. It also consists of a navigation filter for searching particular modules or apps for users with their names. Further, it automatically recommends identical modules and apps to improve their browsing experience.
4) Content Frame
It serves as the major area inside the ServiceNow portal and presents the overall app and module's content. Also, it consists of a necessary apps menu from the management's point of view that provides quick access to essential features.
Users can navigate the ServiceNow platform, use its various features, and customize it for different business needs. It is possible by knowing the components of ServiceNow UI.
ServiceNow Administration
ServiceNow Administration plays a key role in managing sidebar auto-mapping services, general administration, and support for the ServiceNow platform. Business firms use this service to utilize the ServiceNow platform in their activities effectively. Further, this service helps firms in revising their system versions, apps, modules and their settings, UI tailoring, user access control, observing system actions, and UI policies.
Thus, ServiceNow Administration is in great demand in the business sector, and it is essential to handle the Now platform.
Now, let us move to see the creation of a report with the ServiceNow app. Below are the various steps to follow to create an account.
How can a user be added to a group and assigned the admin role in ServiceNow?
Use the following steps to add a user to a group and give them the admin role in ServiceNow:
- Sign in as an admin to your ServiceNow instance.
- Choose "Groups" after going to "User Administration."
- To start a new group, press the "New" button.
- Give the Group a name and a description.
- Preserve the Group's data.
- Click "Edit" after swiping down to the group record's "Roles" associated list.
- After adding the "admin" role, save your changes.
- Check the group form to make sure the admin place has "Inherits=true" selected.
- Hit the option "Edit" and choose the accessible users for adding new users to the Group.
- For adding more users, save the various changes made.
The below steps will help you in adding a "New' user:
- Move to "User Administration" and choose the option "Users".
- Then, choose the option "New" from the list.
- Enter the details like User ID, Name (First & Last), Password, etc. inside the user form.
- Now, save the required "user records."
- Now, move to the section "User Administration" and choose the option "Groups" after adding users to it.
- Choose the desired Group you need, and hit the "Edit" option by moving the User's section.
- Then, enter the "UserName" within the search bar and reserve all the changes.
- Later, reach the "System Security" option and select the "Role Allocation" option to provide an Admin role to the user.
- Now, press the option "This Report" to produce a report for all users at once.
- Locate the role "Admin” and check the availability of users within the user's list allocated to it.
Hence, you can allocate the Admin Role to a user with the ServiceNow platform. Also, add it to a group based on the above steps.
How can a user be created in ServiceNow?
The steps listed below can be used to set up a user within ServiceNow:
- Go to "User Administration" and choose "Users" to launch the User Admin module.
- To add a new user, use the "New" tab.
- Complete the details like User ID, First and Last Name, and Password areas within the user form for the new user.
- The user has to be added to particular groups after that. Under User Administration, pick "Groups" from the left navigation menu.
- Find the right Group (like "Training Admin") and choose it.
- Select "Edit" after scrolling down to view the Group's user list.
- Type the user's name in the search bar and save the modifications.
- It might need to be allocated after the user is added to the Group.
- Choose "Role Allocation" after heading to the "System Security" option.
- To create a report that includes all users, click the "This Report" option.
- To find out if the user has the admin position given, find the "Admin" role and press the "plus" icon beside it.
The above steps can be used to create a user effectively in ServiceNow, allocate them to the relevant groups, and grant them the position of admin.
How can users be added to a group in ServiceNow?
You can take the following actions in ServiceNow to add people to a group:
- Browse to "Users" under the "User Administration" part first.
- To add a new user, select the "New" tab.
- Complete all necessary fields on the user form, including the User details, First & Last Name, Password, etc.
- After the user has been set up, you must add them to a group—press "Groups" within "User Administration" on the left menu.
- Find and choose the particular Group—for example, the "Training Admin" group—that you desire to add the user to.
- In the group settings, go back to the user's tab and select the "EDIT" tab.
- Please enter the user's name into the given search field to locate and choose them.
- For adding users to the set Group, you need to save alterations.
Additionally, you can allow the admin role for a user through the below actions if they need control over the Group:
- Move to the option "Role Allocation" within the "System Security".
- For viewing all users' reports and their assigned tasks, hit the option "this report".
- Find the specific individual and validate they are not given the admin role.
- Hit the "Plus" symbol, which comes after the "Admin role," to allocate them the same.
- Verify the report and ensure that the user is allocated the role "Admin."
The above method will help you add users to groups much faster and provide them with the relevant Admin Role with the Now platform.
How can a group be created in ServiceNow?
For creating a group inside ServiceNow, the below steps will help you:
- Go to the "User Admin/Groups" from the menu bar.
- For creating a new group, click on the button "New". Now, add the details needed, like the name and summary of the "Group".
- Press the option "Save" to reserve the "Group" after adding the relevant details.
- Acquire the "Group" record and swipe to the required list of "roles" to assign the rights of a "New Group Admin". As a result, adding or removing rights becomes far easier because changes made to the Group's configuration will instantly affect every user of the Group.
- Then, select the option "Edit".
- Add the "Admin position" to the list of roles and retain the changes.
- After you add the role, ensure that the admin role has chosen "Inherits=true" within the arranged Group created.
Hence, you can easily set up the Group inside ServiceNow, providing it with admin rights through the above steps.
What is the role of user groups in ServiceNow?
Because they make it easy to refer to users who have similar features or roles as a group, user groups are essential to ServiceNow. Admins and users are given an easy way to manage and arrange access control and privileges by setting up groups.
As a result, adding or removing rights becomes far easier because changes made to the Group's configuration will instantly affect every user of the Group.
Another way that users can work closely on projects or tasks collectively is through user groups. Users can more easily interact, exchange data, and work closely on different aspects when they exist in a similar group. It fosters productivity and collaboration inside the company.
Furthermore, ServiceNow user groups can be utilized to speed up plenty of other activities. Groups are useful, for instance, in process approvals, the members of that Group look over and authorize requests or changes together. It guarantees that many views are taken into account prior to making key choices.
Also, user groups enable the receipt of alerts and changes specific to a particular group. Users can be updated about major incidents, such as future maintenance, system failures, or policy updates, by creating group notifications. By doing this, it is made sure that everyone in the Group gets accurate and timely data.
How are users and groups configured in ServiceNow?
Users and groups are set up in ServiceNow to control their rights and access inside the system. The setup of users and groups is outlined as follows:
1. Creating a User
- Connecting users with the ServiceNow instance is the duty of the ServiceNow admins.
- Admins must go to "User Admin" and select the "new" option to add a new user.
- The admins need to fill up the following fields: User ID, First & Last name, and Password within a user form.
- Also, you can add more users through the LDAP links. Further, pre-existing users are easily available by default (ITIL, Employee, Admin, etc.).
2. Creating Group:
- ServiceNow platform divides users on the basis of allocated roles or goals, providing handling of users like a group.
- Admins can easily access the "User Admin/Groups" and choose the option "New" to begin a new group.
- Moreover, admins should mention the Group's name & description while creating and saving it.
- Every group member will have some authority through the roles offered to them.
3. Role Assignment
- Based on the level of access and the rights of the users, they are allocated roles within ServiceNow.
- In the company, based on their responsibilities, a specific role is allocated to the users. It gives the potential to run various jobs and access to a particular information.
- In ServiceNow, an admin, as a user, has access to various roles.
- Further, admins can allot the rights and access to any group or an individual user by assigning a specific role.
4. Managing Group Users:
- It is more effective to manage a user's Group rather than managing a single user.
- Admins have the right to add or delete any user from a group after creating the Group.
- The admins have the right to add or delete users from a group record with the "Edit" tab.
- All members of the Group can instantly assign rules, business rules, other features of the Group, etc.
5. User Role Verification:
- ServiceNow platform offers a report of role assignments to make sure the users have proper roles.
- Admins will have access to the report by navigating to the "System Security / Role Allocation."
- By tapping the option "This Report," you can see the users and the roles allocated to them. It allows admins to check whether the users have specific roles like "Admin Role."
Further, by efficiently setting the users and groups within the ServiceNow platform, companies can easily handle the following:
- Access Control
- Simplify permits
- Ensure proper usage of the system within the community of users.
Subscribe to our youtube channel to get new updates..!
Additionally, we will focus on the usage of the ServiceNow app for developing reports. These steps will help you to set up an account and verify user roles.
Creating Report in ServiceNow
Let's see how to create a report using ServiceNow.
1) Report preparation.
- Enter "report" into the Navigator for filtering.
- Then, several predefined reports will be ready.
- Select "Create Report" from the menu.

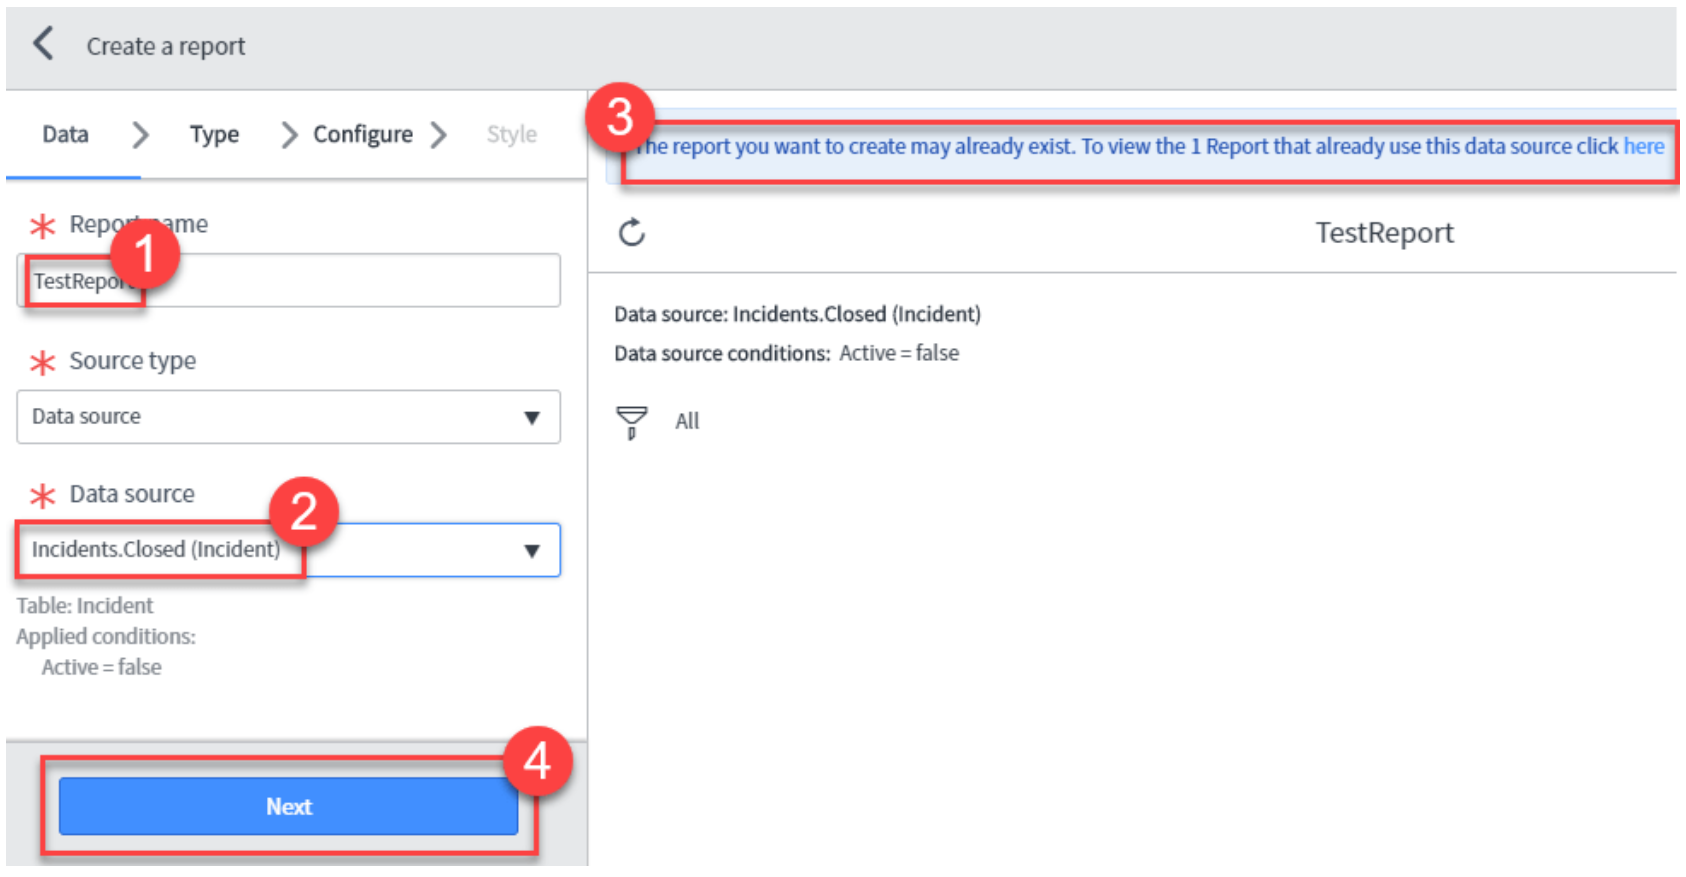
2) On the following report creation screen.
- Put "Report Name" in here.
- Select the "Table" as the Data Source.
- An alert stating that the report has been set up can appear. Kindly ignore it.
- Now, choose the "Next" option from the menu.
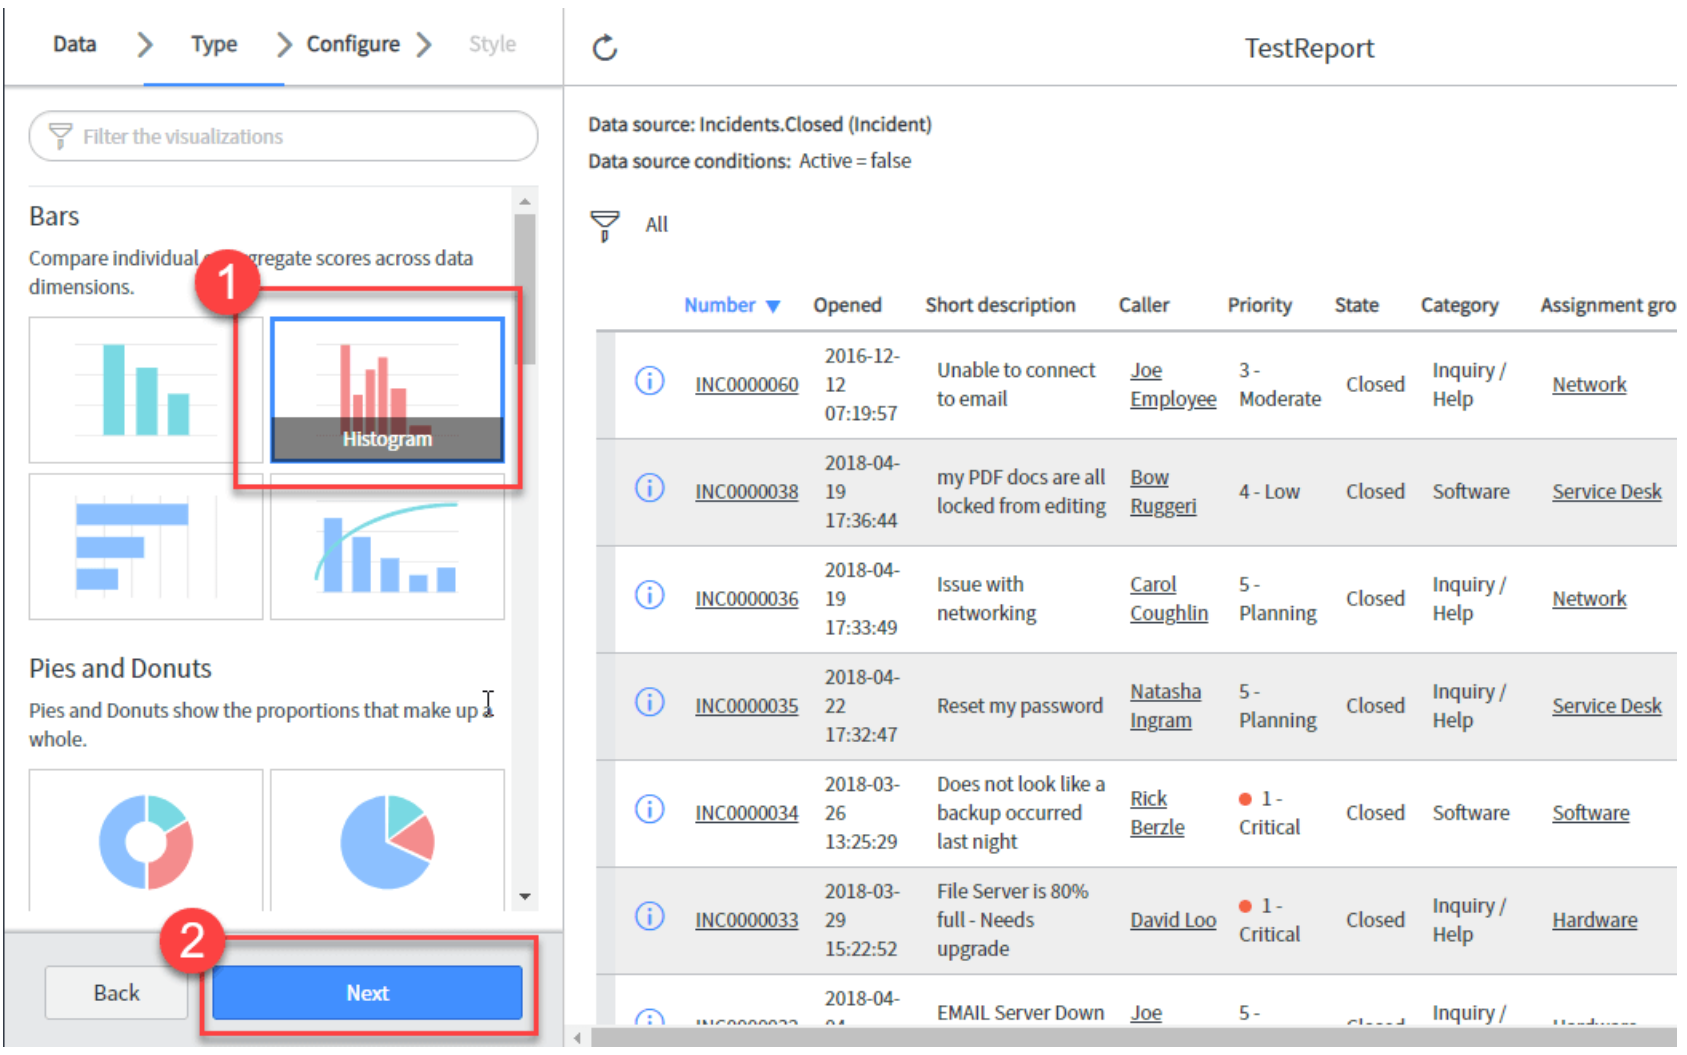
3) Move next to the "report" screen.
- Select "Report Type" by choosing.
- Select the "Next" option from the menu.
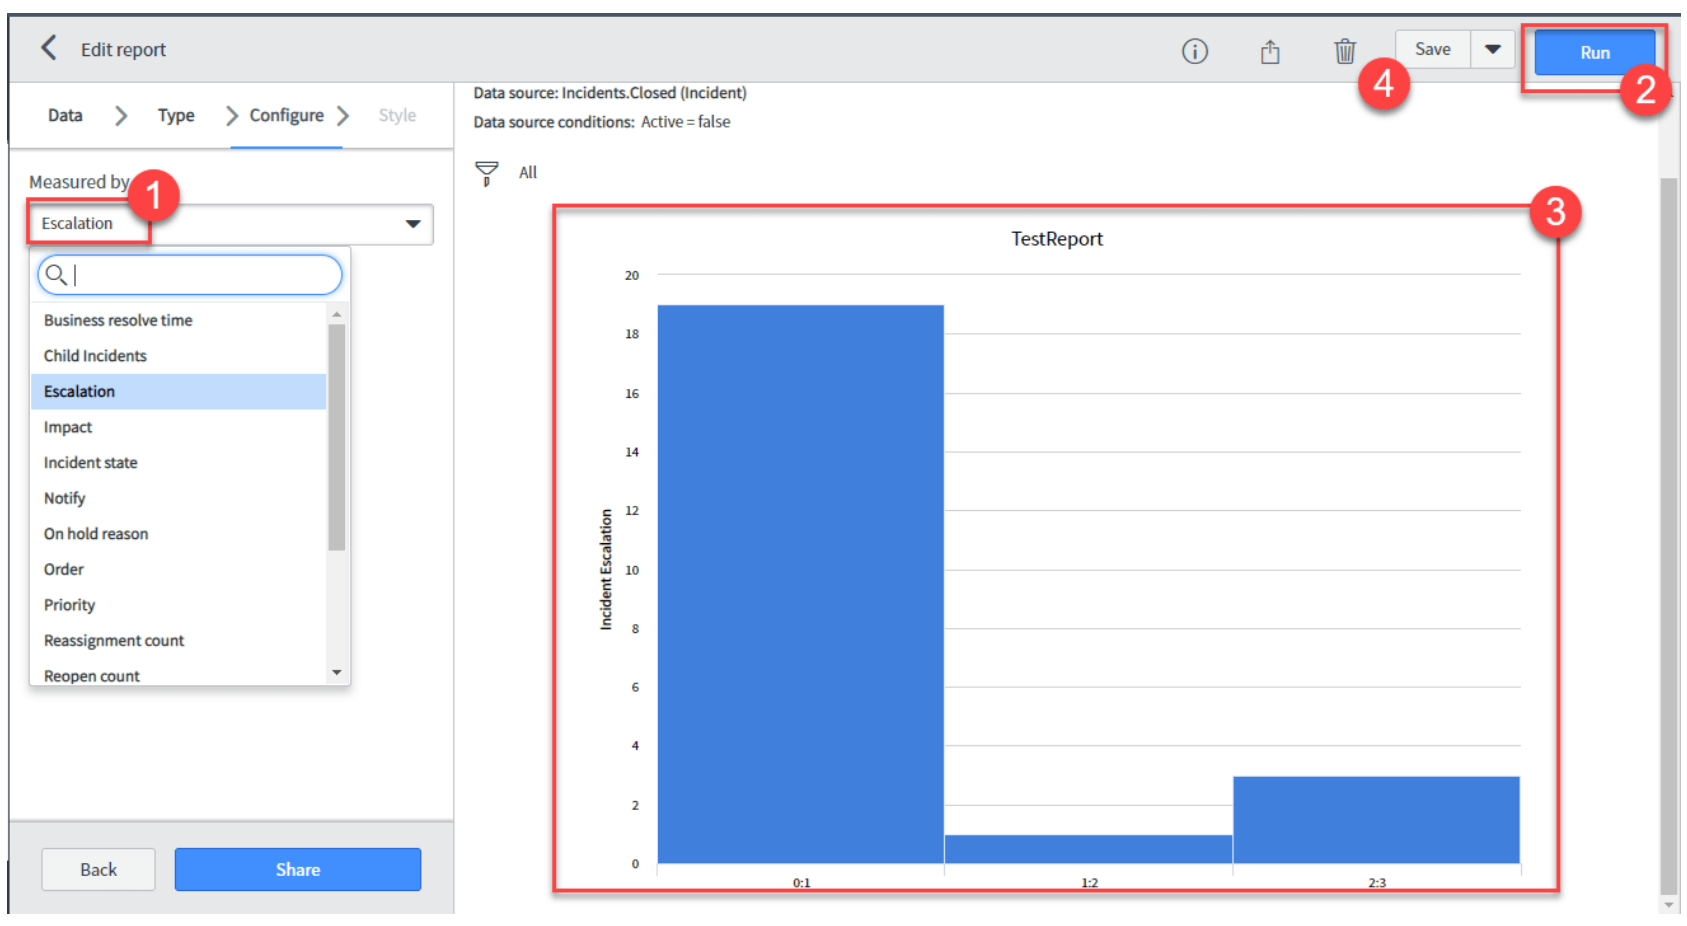
4) On the following "Edit" report screen.
- Choose the "Measure". In this instance, "Escalation" is the option we need to choose.
- Select the "Run" option from the menu.
- A report will be produced.
- For saving the Report, click the option "Save".
What fields are required when creating a new script?
Certain fields must be filled out while making a new script.
First, we must fill in the "Script Include Name" column with the script name to be added. The script included with the system will be detected and addressed by this name.
The "API Name" field comes next. It needs to be unique and is used for the internal script involving the name. Then, calling the script involved from other apps is mostly utilized.
To make use of the script included within client-side scripts, we can use the checkbox "Client Calable." It needs verification. Following this checkbox enables the script included to be used from the client side. It can be used via client scripts or UI actions.
We also have to mention the application where we can use the "script include ." It is accomplished within the "Application" field, in which we give the name of the application that will use this script.
The last field is the "Accessible from" field, which sets the script's accessibility scope for building an app. We can define the scope of the application for script inclusion to handle the specific area of application access and make it used.
Also, we can develop a new script include by entering the necessary fields with relevant details. Further, we can assure the script's right usage inside the application we desire.
How can we create a new script include using the System definition module?
Use the below steps to build a new script, including through the module System definition:
- Open the "System Definition" page within your platform.
- Go through the System definition relating to the 'Script include' module.
- Select the 'new' option to initiate the process of producing a new script.
- Give the script include a name within the script include form. The title makes it easy for you to find and control the script included inside your system.
- The internal script includes the name originating from the API name field. Then starting the script include from other scripts or apps, this name is essential.
- Check the 'client callable' checkbox if the script inclusion needs to be utilized inside client-side scripts. You can now call the script's functions or classes when needed because they have been listed as available from client-side scripts.
These guidelines can be applied when creating a new script using the System definition module. Then, you may utilize this script within the system to provide unique features and classes for distinct server-side and client-side scripts.
What are the types of server-side scripting on ServiceNow?
On ServiceNow, server-side scripting comes in two primary kinds: Script includes and business rules.
Modules holding business rules are located in the software for system definition. You can select the "New" option to start defining business rules. Logic that should be carried out on the server or database end is defined by company policies. They offer a drop-down interface that makes it easy to create basic business rule activities.
You may carry out a number of tasks, like including messages to a form or changing field values, using company rule activities. Considering when to apply business rules is an essential part of their design. You can choose from a number of choices to specify this:
1) Before
The execution of these business rules precedes the execution of a database action. Prior to making any database modifications, they carry out their logic.
2) After
In contrast, these business rules take effect following the end of a database activity. They are carried out following the database's modifications.
3) Asynch
These business rules employ a different strategy. Though they quickly put their logic into action, the scheduling system puts them up for action shortly after the database action. There is no assurance that the execution will happen instantly, though.
4) Display
When a form is submitted, and the data is fetched from the database, display business rules carry out their logic. They are in use for carrying out tasks that ought to be started upon the presentation of a form.
You can specify the precise database activity at which the business rule should run, along with choosing when it should run. It allows you to decide when and how the logic of the company's rule is carried out.
How can I develop applications on ServiceNow?
You may use the apps and functions that are already included in the platform to build apps on ServiceNow. These features make the ITSM deployment easier for companies of any kind. Moreover, ServiceNow gives developers a chance to use JavaScript ideas to build unique modules and apps that meet certain business requirements.
Moreover, there is an essential and robust "Studio" app provided by ServiceNow that helps to build various apps. With this robust app, you can build new and innovative apps based on your needs. It also offers the potential to develop tables similar to apps you have and build UIs, including source codes. Further, it helps to develop many other useful apps through a managed user interface.
Also, the "Create Application File" is a feature of the Studio app that helps to add many UI elements, modules, and tables. It helps you improve the application's usage much better. Further, you can build tables such as "ROTA" that help to store relevant data related to apps.
Thus, ServiceNow offers the flexibility to design and develop robust and custom apps as per business needs.
How does ServiceNow support customer satisfaction and revenue generation?
ServiceNow is essential to enhance customer satisfaction and promote revenue growth. This platform supports its customers and makes sure their demands are met by offering them incredibly efficient service. Many studies suggest a possibility of between 60 - 70% of happy consumers to buy new products. On the other hand, the chance of bringing a new product to an unexplored market is reduced by up to 20% approx.
It illustrates the way in which companies may earn revenue through ServiceNow's excellent customer service in an indirect manner. By offering quick support, ServiceNow assists in the growth of solid client relationships, improving levels of fulfillment and enhancing chances of upselling and recurring revenue.
What is the ServiceNow workflow, and how does it work?
With the use of the platform's intuitive drag-and-drop feature, users may automate difficult, multi-step procedures using the ServiceNow workflow tool. By creating a workflow—a list of actions—users are able to simplify and enhance their business activities.
Every workflow is made up of several interrelated tasks that run logically together. ServiceNow has a graphical Workflow editor to help make the workflow easier to use. The workflow is shown in this editor as a flowchart, with tasks and changes between them portrayed using graphical elements like boxes, lines, etc.
Users can quickly understand the different processes in the workflow as well as the dependencies and relationships between tasks. It is possible by using the flowchart representation. It offers an acceptable visual depiction of the flow of data and tasks from one task to the next.
With the drag and drop tasks into the canvas and linking them with lines to show the data or control flow, users can customize their workflows. These actions can be set up to carry out specific tasks like issuing alerts, updating data, or starting automatic processes.
The freedom to include criteria, approvals, and disputes related to business rules & logic is another feature of ServiceNow workflows. It helps users to build various workflows that follow the firm's different needs.
How do I download the ServiceNow setup?
Let us know the various steps to download the setup of ServiceNow:
1) Open a browser and enter this URL: https://developer.servicenow.com/
2) Then, you need to give the registration credentials on the web page. Then, give the relevant details and "Submit" them.
3) Later, you need to check your email's inbox. Also, you need to follow a message containing verification details. To finish the process of activation, you must follow the email instructions.
4) For this, you are allowed to use the login credentials to access after the account's activation.
How can ServiceNow be configured?
The 'ITSM-guided setup' system, which the System Admin mainly accesses, can be utilized to set up ServiceNow. Using this application, you may configure the IT SM apps on the ServiceNow Instance gradually from the very start of setup.
Users can access the 'ITSM guided setup' app by going to the ITSM area of the navigation bar and starting with the setup procedure there. Pressing the "Get Started" option is the first step. After that, a list of duties organized into several sections like connection, company, data, and more are displayed.
The guided setup menu includes multiple areas that need to be tailored separately. To give an overview of the setup process, the status of every Group is shown. Clear knowledge of the setting process is ensured by the end status that appears in the content frame at the page's top.
It is possible to assign separate admins to each Group in order to divide up setup tasks better. This enables a targeted and efficient method where every user can customize the settings based on their areas of expertise.
The extensive and apparent guided setup processes offer full support to users throughout the installation process. Additionally, users can experiment and explore with multiple choices to set up different groups that meet their own needs.
In conclusion, the 'ITSM-guided setup' system, which provides a systematic way to set up ITSM systems, can be used to configure ServiceNow. Getting links, data set up, company details, and other things fall under this Group.
What is the architecture of ServiceNow?
There are different elements of the platform that collectively form ServiceNow architecture, and they offer support in its various actions. Let us know these elements in brief:
1) Apache Web Server
It is one of the main elements of the ServiceNow app that replies to the arriving web requests. Further, it helps to build relations between the customers and the ServiceNow app.
2) Database
ServiceNow may connect with various DBs that efficiently manage and store data along with MySQL, Oracle, etc. There are different data, including user profiles, config settings, and data related to some ServiceNow features, etc., consisting of these databases.
3) J2EE App server:
This server plays an essential role as it hosts the ServiceNow app. Its server helps with a runtime environment to execute Java-based programs and effectively handles various functions. Also, it helps in managing requests, resource distribution, and integrating services.
4) Load balancer:
The load balancer divides the arriving network traffic across different servers to optimize workload for higher performance. It also allows effective traffic handling and keeps any one server from overloading.
5) Firewall clusters:
Based on pre-built security policies, these are network security systems that track and regulate arriving and outgoing online traffic. Firewall clusters are also used within the ServiceNow design to give additional security. Also, it defends the infrastructure from hostile attacks and illegal access.
6) Internet Protocol Security (IPsec):
The IPsec (Internet Protocol Security) is a group of protocols that ensures safe relations throughout the IP networks. The Now platform protects data security and integrity during transit through IPsec to build encrypted links between different elements.
7) Client site:
The client/customer site is the place that connects customers with the ServiceNow platform. The platform also helps employees use a simple interface to access all their private resources to execute different tasks within the platform. It is possible either through mobile apps or a web browser.
Importing Sets in ServiceNow
Imports Sets are essential to ServiceNow's efficient operation. System admins can map data with the ServiceNow tables by importing data from various data sources using these Import Sets. The finished reports may be assessed and the import set tables can be wiped up when the import set is done. viewing the import log gives details on the internal processes that take place while on an import. To show this practically, let's import a data set "sample.xlsx" and map it to a ServiceNow table. This link will help you download this data set. This sample display on your device needs an active ServiceNow instance.
1) Within the System Import Sets section, find "Import Sets" and choose "Load Data". Click the "Submit" button after selecting the file you want to import (in this example, "sample.xlsx," which is our file described in the link above).
2) To view the imported data, select the Loaded Data option.
3) The screen below shows the imported data set. The "cog" setting icon can then be selected to customize the table columns to your preference.
4) Let's build an import set table right now. Let's create a table targeted for the Import Set. To accomplish it, enter "system definition" into "Filter Navigator," select "tables,"and select "new."
5) Proceed and select "Sample Table" as the table's label. To add the names of column to the table, select the "Columns" section after that.
6) Make sure the table you wish to map has the column names added. Then, it's done; press the "Submit" option.
7) Now that the table has been formed, it is empty. It is the look of the record field within the "Filter Navigator" while you browse for it.
8) Let's load the data that was imported set next. Follow the directions that appear on the screen.
9) After the data gets loaded, the state field shows "Complete". After that, you may see it by tapping on the "Loaded Data" menu.
10) The screen below displays how the data looks.
11) For the sake of simplicity, we'll tailor the column list.
12) The tailored view of the imported data is shown on the screen beneath.
Creating Transform Maps
Now, let's use the ServiceNow platform to build the transformation maps. To carry out this, go back to the prior page, where the screen shows the entire status following the data loading. Utilize the steps that follow to produce a transform map.
1) Hit the "Create transform map" after going back to the last page.
2) For mapping, enter the "Name" and choose the "Source” and "Target” tables. Press "Mapping Assist" to begin mapping the fields. Selecting "Auto Map Matching Fields" will also allow you to map the areas automatically.
3) Both the source and target tables can map the required fields manually when you select "Mapping Assist".
4) Let's map the fields as they appear on the screen below and hit "Save."
5) After saving the work progress, press the link "Transform".
6) Then hit the option "Transform" to reconfirm the same.
7) Here, the status field presents the full value to show the modification is over.
8) Now, move ahead and enter the table's name (Sample Table) with the "Filter navigator" option. It helps to check the fields and records needed. The following screen presents these details.
Thus, we have imported the data set as we required and mapped the same to the ServiceNow table.
How can a user be added to a group and assigned the admin role in ServiceNow?
Follow the below steps for adding a user to a specific group and allocate the admin position to it within ServiceNow:
- As an admin, get access to the ServiceNow instance.
- Move to "User Administration", choose the option "Groups".
- Now, hit the "New" tab to build a new group.
- Enter the Group's name and its description.
- Let's "save" the group records.
- Tap the "Edit" option by scrolling down to the associated list of "Roles" inside the group record.
- Add the role "Admin" and save the modifications.
- Make that the group form's "Inherits=true" setting for the admin position is chosen.
- Make that the group form's "Inherits=true" setting for the admin position is chosen.
- Now, reserve the changes for adding people to the Group.
Here are the steps to follow to create a new user.
- Navigate to the "User Administration" section and choose the option "Users".
- Hit the "New" option.
- Enter the fields needed within the user form like User ID, First and Last Name, Password, etc.
- Preserve the user record.
- Move to the "User Administration" section for adding users to the Group, and choose the option "Groups".
- Press the required group tab and swipe down to the section "users' and press "Edit".
- Enter the "username" to add within the search bar, and save the modifications.
- Now, you can allocate the admin position to the user by moving to the "System Security" section and choosing the "Role Allocation" section.
- Then, hit the option "This report" to produce an all-user report.
- Now locate the admin position and verify whether the user is recorded as an allocated user.
Hence, the above steps can help you add a user to the Group and allocate them an admin role within the ServiceNow platform.
How can a user be created in ServiceNow?
Creating a user within ServiceNow, you need to follow the below steps:
- Enter into the "User Admin" module by moving to the "User Administration" and choosing the option "users."
- Hit the tab "New" for a new user creation.
- Within the user form, update the fields with User ID, First and Last name, and new user's Password.
- Then, you need to add user requirements to particular groups. Now you need to move to the "left navigation" menu and choose the "Groups" option within the "User Administration".
- Find and choose the proper Group, like "Training Admin".
- Now move down to the user list within the Group and hit the option "Edit."
- Enter the "user name" within the search bar, and save all the modifications.
- Once you add a user to the Group, you may be required to allocate the admin role. Now move to the "System Security" option and choose "Role Allocation."
- Then, choose the option "This report" to produce all user's reports.
- Locate the "Admin" position and hit the "+" symbol next to check whether the admin role is allocated by the user.
Thus, the above steps will help you to create a user within ServiceNow and allocate the necessary groups using the required Admin role.
[Related Article: Servicenow Service Mapping]
Why do we need ServiceNow?
ServiceNow is a leading technology that supports business enterprises in simplifying and improving their multiple processes. They can avoid the old-fashioned practices and set up new workflows that run through ServiceNow. Moreover, using this central platform, employees and customers can send various requests. It simplifies the processes effectively.
Moreover, ServiceNow has the ability to organize work and improve teamwork, which gives many benefits. Multiple departments may closely work to locate issues and help by fixing them. Employers can promote the knowledge-sharing system across their employees. It will help them become an expert in resolving issues with this platform.
The ServiceNow platform impacts employees well in their service and improves their standards. Moreover, businesses can enhance their service levels and speed up their processes using this amazing tool. It processes requests much faster and quickly responds to them to provide client satisfaction through task automation.
Frequently Asked Questions
Is ServiceNow hard to learn for beginners?
The fundamentals are approachable for most people, especially with hands-on practice in a free instance. It looks complex at first because of the number of modules and terms, but the core concepts of tables, records, forms, and workflows are logical and build on each other. Start with configuration rather than code and it is very manageable.
Do I need coding experience to learn ServiceNow?
No, not to begin. A large portion of ServiceNow work is configuration through point-and-click interfaces. JavaScript becomes important as you move toward developer-level work, but you can start and even reach the first certification without heavy coding.
Which programming language does ServiceNow use?
JavaScript. It is used for Business Rules, client scripts, Script Includes, and other server- and client-side scripting throughout the platform.
What are the main parts of ServiceNow?
The most commonly referenced products are ITSM (IT Service Management), ITOM (IT Operations Management), and CSM (Customer Service Management), all built on a single shared platform and database. ITSM is the best starting point for beginners.
How do I practice ServiceNow for free?
Sign up for a free Personal Developer Instance (PDI) on the ServiceNow Developer site. It gives you a fully functional copy of the platform with admin access to learn and build on. Log in periodically so it does not go idle.
Which ServiceNow certification should I start with?
The Certified System Administrator (CSA). It is the foundational certification and covers the core fundamentals, making it the standard entry point to a ServiceNow career before you specialize.
Conclusion
Hence, you have gone through the ServiceNow tutorial and its potential to resolve complex issues with automation. It offers different workflow models that help employees speed up their processes with good strength and versatility. Thus, there are many benefits of using the ServiceNow platform in business enterprises.
Related Articles
Categories
- Top ServiceNow Integrations one Should Know
- What is Servicenow
- ServiceNow Certification
- ServiceNow Interview Questions
- Servicenow Tutorial
- ServiceNow Ticketing Tool
- Servicenow SLA
- ServiceNow Fundamentals
- ServiceNow Administration
- ServiceNow Developer Instance
- ServiceNow Reporting
- ServiceNow Integration

Neelima
Servicenow AdministratorRequest for more information
Popular Blogs